Author: dastakhov

  • Essential Art Resources for Illustrators, Animators, and Graphic Designers

    Essential Art Resources for Illustrators, Animators, and Graphic Designers

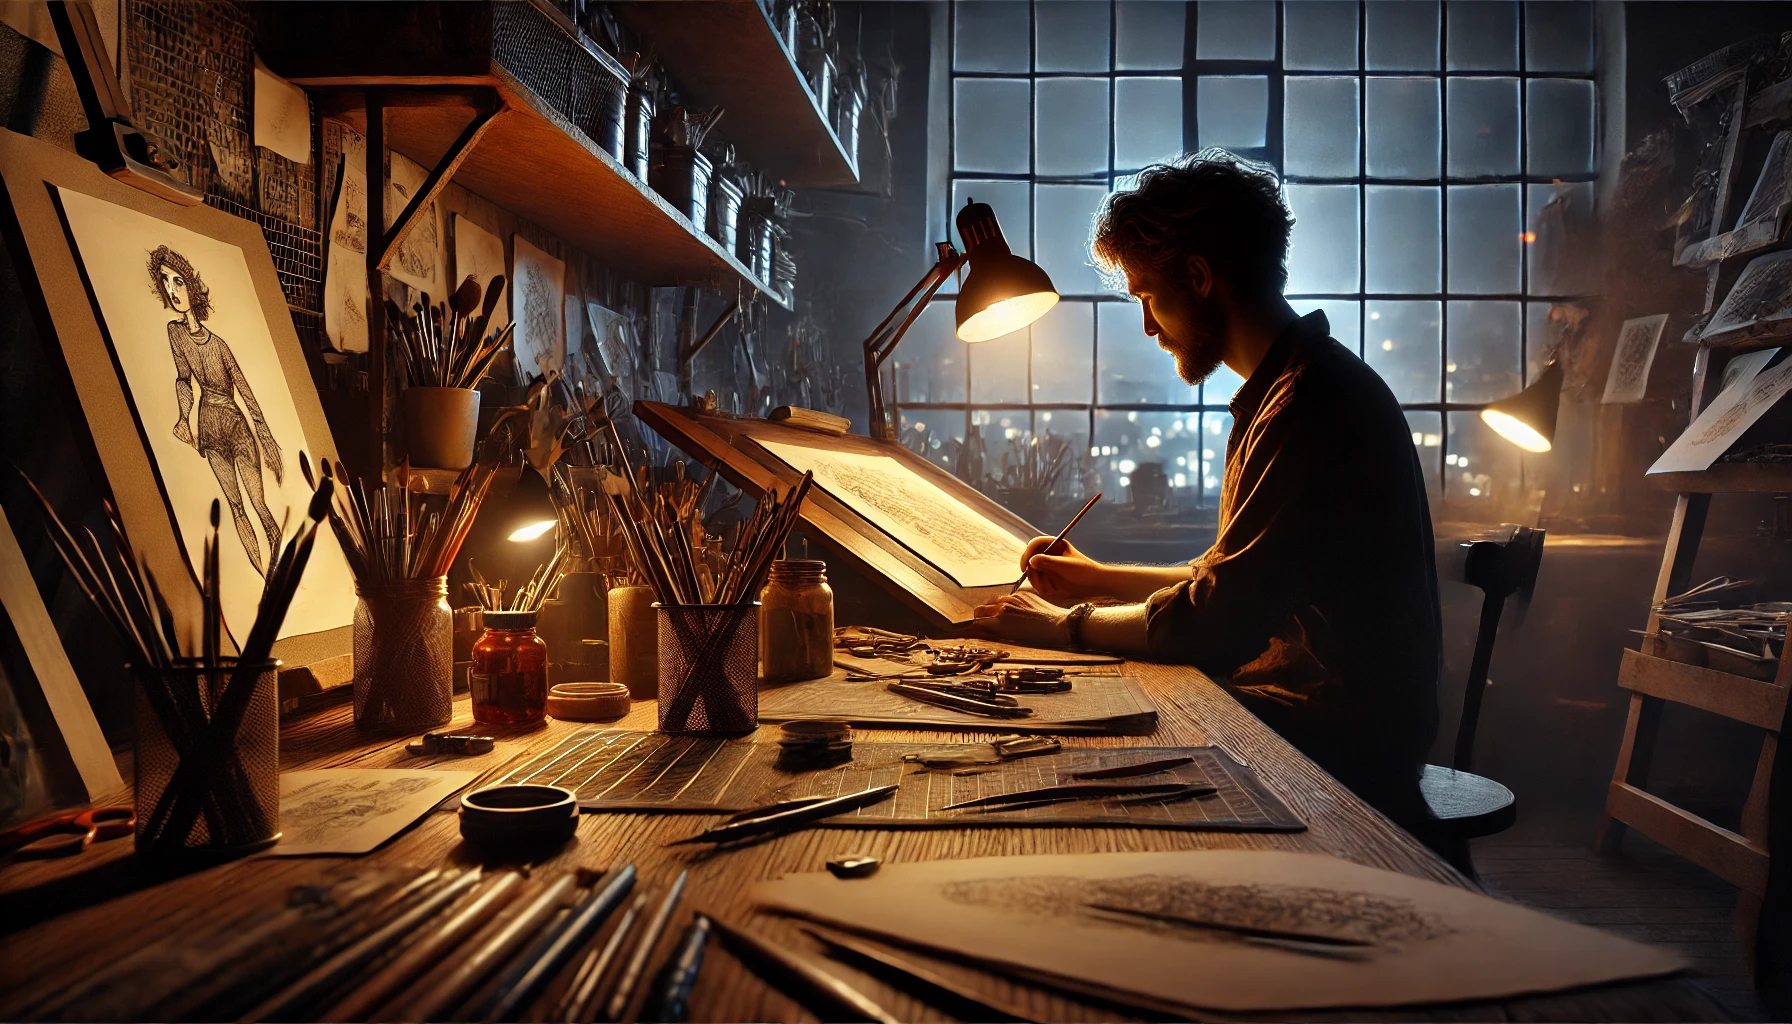
    In the fast-evolving world of art and design, staying updated with the latest trends, techniques, and industry news is essential. Whether you’re an illustrator, animator, or graphic designer, having the right resources at your fingertips can elevate your craft and keep you inspired. Here’s a curated list of magazines, online platforms, and communities that every creative professional should explore.

    Magazines (Print & Online)

    Communication Arts

    One of the most respected publications in the creative industry, Communication Arts is a must-read for anyone involved in design, illustration, advertising, photography, and interactive media. The magazine offers in-depth articles, interviews with industry leaders, and showcases of cutting-edge work. If you’re looking to stay informed about the broader creative landscape, this magazine is a great starting point.
    Link: Communication Arts

    Print Magazine

    For graphic designers, Print Magazine is a treasure trove of insights into visual culture. It covers everything from design thinking and branding to typography and the latest trends in graphic design. With a focus on thoughtful analysis and rich visuals, Print is perfect for those who want to delve deeper into the theory and practice of design.
    Link: Print Magazine

    3×3 Magazine

    Illustrators will find 3×3 Magazine particularly inspiring. Dedicated solely to contemporary illustration, it features work from some of the most talented illustrators around the globe. The magazine’s focus on high-quality art and its annual illustration awards make it a significant resource for anyone looking to make a mark in the world of illustration.
    Link: 3×3 Magazine

    ImagineFX

    If your interests lie in digital art, particularly within the realms of fantasy and sci-fi, ImagineFX is a leading magazine in this niche. It’s packed with tutorials, artist interviews, and galleries of stunning artwork. ImagineFX is known for its practical advice, helping digital artists improve their skills while staying inspired by the latest trends in the industry.

    Link: ImagineFX

    How Magazine

    How Magazine is a fantastic resource for graphic designers who want to keep up with the latest in branding, packaging, and typography. It also offers valuable advice on the business side of design, making it a comprehensive guide for creatives who are running their own studios or freelancing.

    Link: How Magazine

    Creative Review

    Creative Review is a UK-based publication that covers the best in advertising, design, illustration, and photography. It’s known for its focus on new perspectives and critical discourse, making it an essential read for creatives who want to stay ahead of the curve.

    Link: Creative Review

    Online Platforms and Blogs

    Behance

    A platform where creatives from all fields can showcase their work, Behance is particularly popular among illustrators and designers. It’s a great place to get feedback on your work, discover new talent, and even find job opportunities. The ability to follow and interact with other artists makes it a vibrant community for anyone in the visual arts.

    Link: Behance

    Dribbble

    Similar to Behance but with a more focused community, Dribbble is a platform where designers, illustrators, and creatives share small screenshots (shots) of their work. It’s ideal for those looking to get quick feedback, explore UI trends, or find inspiration for typography and branding projects.

    Link: Dribbble

    Muddy Colors

    Muddy Colors is a blog that offers tutorials, industry insights, and interviews with some of the leading illustrators and concept artists in the world. It’s particularly useful for artists working in traditional and digital illustration, providing a wealth of knowledge from professionals at the top of their game.

    Link: Muddy Colors

    Cartoon Brew

    For animators, Cartoon Brew is a leading source of news, reviews, and industry updates. Whether you’re interested in indie animation or big studio productions, this platform keeps you informed about what’s happening in the world of animation, offering critical insights and behind-the-scenes looks at upcoming projects.

    Link: Cartoon Brew

    Animation World Network (AWN)

    AWN is another fantastic resource for animators, offering articles, news, and resources that cover everything from software reviews to industry trends. Whether you’re a seasoned professional or just starting out, AWN provides valuable content that can help you stay ahead in the animation industry.

    Link: AWN

    Smashing Magazine

    Focusing on web design and development, Smashing Magazine offers a wealth of articles and tutorials on UX/UI design, typography, and creative coding. It’s an essential resource for graphic designers who are involved in digital design, offering practical advice and cutting-edge insights.

    Link: Smashing Magazine

    The Dots

    The Dots is a professional networking platform for creatives, including graphic designers, illustrators, and animators. It offers a space to showcase your portfolio, connect with industry professionals, and find job opportunities. The Dots is particularly useful for freelancers and those looking to expand their professional network.

    Link: The Dots

    Motionographer

    Motionographer is dedicated to the art of motion graphics and animation. It offers inspiration, industry news, and showcases some of the most innovative work in the field. For those involved in motion design, this platform is a must-visit for staying inspired and informed.

    Link: Motionographer

    News Outlets and Online Communities

    It’s Nice That

    It’s Nice That is an online platform that showcases creative work across design, illustration, animation, and art. It focuses on emerging talent and offers a daily dose of inspiration with its beautifully curated content.

    Link: It’s Nice That

    Creative Bloq

    Creative Bloq provides daily design inspiration, news, and tutorials specifically for illustrators, animators, and graphic designers. It’s a versatile resource, offering everything from software reviews to in-depth articles on design trends.

    Link: Creative Bloq

    DesignTAXI

    DesignTAXI is a go-to source for news, trends, and inspiration in the world of design, art, and culture. It’s particularly useful for creatives who are interested in the intersection of design and business, offering a broad range of content that’s both informative and inspiring.

    Link:DesignTAXI

    Illustration Age

    For illustrators, Illustration Age is a blog dedicated to the professional illustration community. It offers resources, interviews, and articles on the business of illustration, making it an invaluable tool for those looking to build or expand their careers in illustration.

    Link:Illustration Age

    CGSociety

    CGSociety is a community platform for digital artists, particularly those involved in computer graphics, animation, and visual effects. It offers forums, tutorials, and galleries that are rich with inspiration and practical advice for artists working in these fields.

    Link:CGSociety

    Conclusion

    Whether you’re an illustrator, animator, or graphic designer, having access to the right resources can make a significant difference in your creative journey. These magazines, platforms, and communities offer a wealth of knowledge, inspiration, and opportunities to connect with other professionals in your field. Explore these resources to stay informed, improve your skills, and continue to grow as a creative professional.

  • Celebrating Creativity and Community at the High Desert Open Arts Exhibition

    Celebrating Creativity and Community at the High Desert Open Arts Exhibition

    High Desert Open Arts Exhibition

    In March 2022, the Victor Valley Museum, in partnership with Arts Connection – the Arts Council of San Bernardino County, hosted the much-anticipated High Desert Open Arts Exhibition. This event was a celebration of the artistic diversity and cultural richness of the High Desert. It brought together a diverse mix of artworks, ranging from photography and printmaking to painting, ceramics, and mixed media. The exhibition provided a unique platform for both emerging and established artists to share their stories, dedication, and craft with the community.

    For me, this exhibition was particularly special as I had the honor of participating and was thrilled to receive the “Best in Drawing” award for my work, a charcoal drawing of James Hetfield of Metallica. To have it recognized in such a meaningful way at a venue like the Victor Valley Museum was a moment of immense pride and gratitude.

    The Exhibition: A Showcase of Talent and Dedication

    The High Desert Open Arts Exhibition was a testament to the incredible talent that resides within our community. Each piece displayed in the exhibition reflected the artist’s unique perspective, skill, story, and vision. From the meticulous craftsmanship of the printmaking pieces to the striking impact of the paintings, the exhibition offered a rich visual experience that resonated deeply with viewers.

    The image shows people viewing artwork in a gallery with paintings on the walls and a wooden bench in the center.

    The exhibition also featured live demonstrations, allowing visitors to witness the creative process firsthand. These demonstrations were not just educational but also deeply inspiring, as they offered a glimpse into the dedication and skill required to create such beautiful works of art. The event was further enriched by live music provided by Ray Brooks and engaging art activities for children, making it a truly inclusive and family-friendly experience.

    The Organizers: A Heartfelt Thank You

    Events like the High Desert Open Arts Exhibition don’t happen without the hard work and dedication of many individuals. I would like to take a moment to acknowledge and express my gratitude to those who made this exhibition possible.

    Theresa Polley-Shellcroft, a colleague of mine at Victor Valley College, played a pivotal role in organizing the exhibition. Theresa is an accomplished artist and educator with a passion for fostering creativity in others. As an art instructor at VVC, I’ve had the pleasure of working alongside her, and her commitment to the arts is truly inspiring. Theresa’s influence and dedication were evident throughout the exhibition, from the curation of the artworks to the overall atmosphere of the event.

    T. Faye Griffin, another key figure in the exhibition, is a multi-talented artist, writer, and producer. Her contributions to the arts are vast and varied, and she brings a wealth of experience and insight to any project she undertakes. Faye’s involvement in the High Desert Open Arts Exhibition helped elevate the event, ensuring that it was not just a showcase of talent but also a celebration of the creative spirit that drives us all.

    Mary Vasquez is an exceptional printmaker, artist, and art teacher. Her work is characterized by its depth, emotion, and technical skill. Mary has a unique ability to convey complex ideas and emotions through her art, and her contributions to the exhibition were nothing short of extraordinary. As an educator, Mary is dedicated to nurturing the next generation of artists, and her influence extends far beyond her own work.

    Kathryn Ervin had the honor of presenting the awards at the exhibition. Kathryn is a respected colleague at California State University, San Bernardino (CSUSB), where I occasionally have the pleasure of working with her on various projects. She is an esteemed professor of theatre and a passionate advocate for the arts. Her presence at the exhibition added a sense of gravitas to the event, and her words during the awards presentation were both uplifting and encouraging. Receiving the “Best in Drawing” award from Kathryn was a truly special moment.

    Another integral figure in the success of the exhibition was Jennifer Kane, whose involvement brought a wealth of experience and creativity to the table. Jennifer’s contributions to the arts are widely recognized, and her passion for fostering artistic expression is evident in everything she does. Her support and dedication were crucial in making the High Desert Open Arts Exhibition a memorable and impactful event.

    Personal Reflections: A Journey of Creativity

    Participating in the High Desert Open Arts Exhibition was a profound experience for me as an artist and educator. The opportunity to showcase my work alongside so many talented individuals was both humbling and inspiring. Winning the “Best in Drawing” award was a moment of validation that I will cherish for a long time. It served as a reminder of the importance of perseverance, dedication, and the continuous pursuit of artistic excellence.

    A group of people gathers in an art gallery, some seated on benches, listening to a speaker. Artwork is displayed on the walls.

    As a videographer, illustrator, and graphic designer at CSUSB, I often find myself immersed in the technical and digital aspects of creativity. Participating in this exhibition allowed me to reconnect with the more tactile, hands-on side of art-making, and it reminded me of the joy that comes from creating something with my own hands. It also reinforced my belief in the power of art to bring people together, to inspire, and to provoke thought and conversation.

    Being an art instructor at Victor Valley College has allowed me to share my passion for art with my students, helping them to discover their own creative voices. The High Desert Open Arts Exhibition was not just a personal achievement but also a reflection of the vibrant artistic community that I am proud to be a part of, both as an educator and as an artist.

    The image shows the Victor Valley Museum's exterior with a red-tiled roof and a large sign. Below are display panels with images related to Anthropology, History, and Biology.
    Victor Valley Museum

    Looking Ahead: Continuing the Artistic Journey

    The High Desert Open Arts Exhibition was more than just an event; it was a celebration of the artistic community that I am proud to be a part of. It highlighted the incredible talent that exists within our region and provided a platform for artists to share their work with a wider audience. I am deeply grateful for the recognition I received and for the opportunity to contribute to this vibrant community.

    Moving forward, I am excited to continue exploring my artistic journey and to share more of my work with all of you. The connections I made and the experiences I gained from this exhibition have inspired me to push the boundaries of my creativity even further. I look forward to participating in more events like this in the future and to continuing to contribute to the rich tapestry of art in the High Desert.

  • Drawing supplies

    Drawing supplies

    Pad of good drawing paper (minimum 18” x 24”): Drawing paper is the foundation of any drawing. It should have a smooth surface that allows for easy pencil or charcoal application without too much tooth (texture) that might interfere with fine details. A larger size like 18” x 24” provides ample space for experimentation and larger compositions. Brands like Strathmore and Canson offer reliable quality. Alternatives: Students can opt for cheaper alternatives like store-brand drawing pads, but they should ensure the paper is of sufficient quality to handle various drawing mediums without tearing or buckling.

    Pad of newsprint or craft paper (minimum 18” x 24”): Newsprint or craft paper is ideal for quick sketches, gesture drawings, and practicing without worrying about wasting expensive paper. It’s cheaper than drawing paper and encourages students to sketch freely without inhibition. Alternatives: Students can use recycled paper or even old newspapers for practice sketches if they’re extremely tight on budget.

    Toned paper (blue, gray, earth colors, 3 pieces): Toned paper adds depth and atmosphere to drawings, especially when working with charcoal or white pencils. It can enhance contrast and help students explore different tonal ranges. Alternatives: Students can make their own toned paper by using inexpensive colored construction paper or by tinting white paper with diluted acrylic paint.

    Tracing paper (budget grade, can be shared): Tracing paper is useful for transferring sketches or refining compositions without damaging the original drawing. It’s lightweight and translucent, allowing for easy tracing and experimentation. Sharing one pad among students can reduce costs. Alternatives: Students can use thin parchment paper or even wax paper as a cheaper alternative for tracing.

    Sketchbook (no larger than 9” x 12” and no smaller than 5”x7″): A sketchbook provides a portable space for students to jot down ideas, observations, and quick sketches wherever they go. The size restrictions ensure it’s convenient to carry around. Alternatives: Students can use any blank notebook or even make their own sketchbooks by binding loose sheets of paper together.

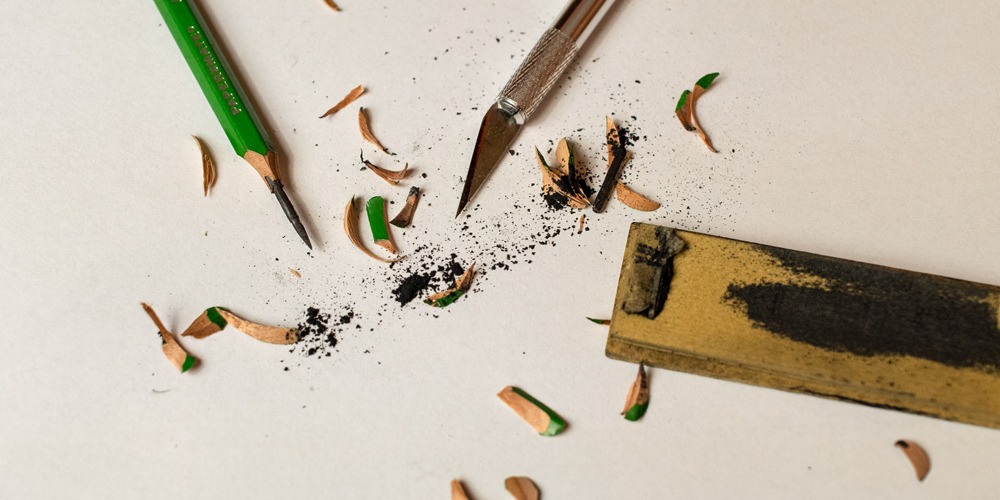
    X-Acto knife: An X-Acto knife is essential for precise cutting and detailing, such as sharpening pencils or creating intricate paper stencils. It’s a versatile tool that can aid in various aspects of the drawing process. Alternatives: A sharp utility knife or a razor blade can serve as a budget-friendly alternative.

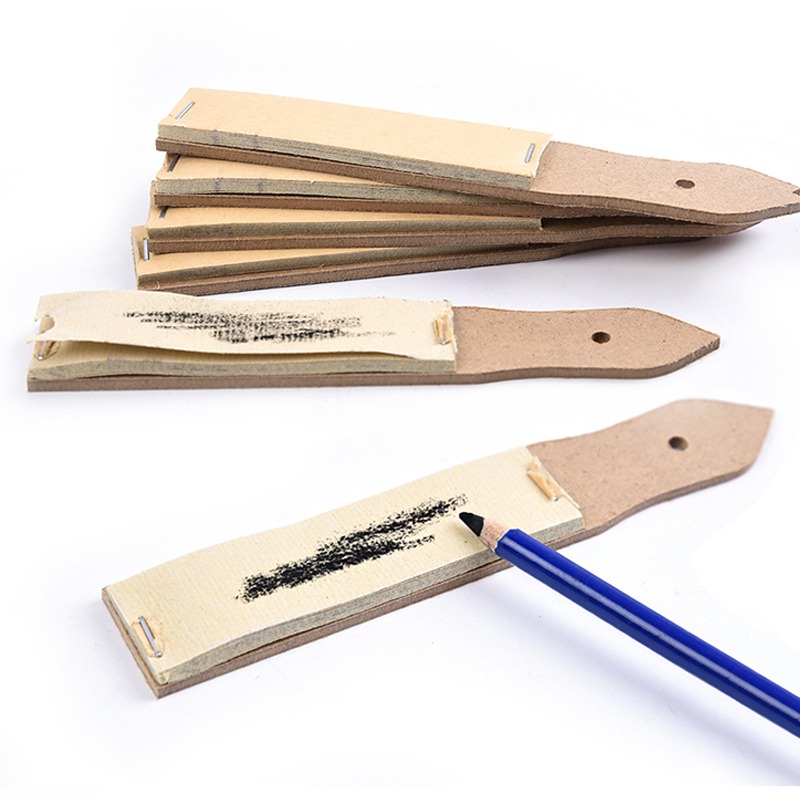
    Sandpaper block or fine sandpaper (medium grit 150 or 220): A sandpaper block is used for sharpening pencils and charcoal sticks to achieve a fine point or edge. It’s an essential tool for maintaining drawing implements. Alternatives: Students can use sandpaper sheets or emery boards as a substitute for a sandpaper block.

    Graphite pencils (4H, 2H, HB, 2B, 4B, 6B or full set): Graphite pencils come in different hardness grades, ranging from hard (H) to soft (B), allowing for varying degrees of line darkness and texture. A variety of grades enables students to achieve a wide range of effects in their drawings. Alternatives: Students can purchase individual pencils of the most commonly used grades (HB, 2B, 4B) rather than a full set to save money.

    Charcoal pencils (hard, medium, and soft): Charcoal pencils offer rich, deep blacks and are ideal for expressive and dramatic drawing. Different grades of charcoal pencils provide varying levels of darkness and control. Alternatives: Students can use compressed charcoal sticks or vine charcoal as a cheaper alternative to charcoal pencils.

    Charcoal white pencils (at least 2): Charcoal white pencils are used for adding highlights and lighter tones to charcoal drawings. They provide contrast and can enhance the three-dimensional quality of the artwork. Alternatives: Students can use white conte crayons or white chalk pastels as substitutes for charcoal white pencils.

    Erasers (Kneaded eraser and White Vinyl Eraser): Kneaded erasers are pliable and can be molded into different shapes for precise erasing and lifting off graphite or charcoal. White vinyl erasers offer more aggressive erasing power and are useful for larger areas. Alternatives: Students can use regular rubber erasers as a substitute for white vinyl erasers, although they may leave more residue.

    Workable fixative: Workable fixative is sprayed on finished drawings to prevent smudging and protect the artwork from dust and fading. It allows students to continue working on their drawings without worrying about damaging them. Alternatives: Students can use hairspray as a budget-friendly alternative to workable fixative, although it may not be as effective or archival.

    Plastic box for supplies: A plastic box provides a convenient storage solution for organizing and transporting art supplies. It helps students keep their materials organized and protected from damage. Alternatives: Students can use any sturdy container or even repurpose household items like shoeboxes for storing their art supplies.

    Optional – blending stumps: Blending stumps are used for smudging and blending graphite or charcoal to create smooth gradients and transitions. They can add depth and dimension to drawings. Alternatives: Students can use rolled-up paper or their fingers as a budget-friendly alternative to blending stumps.

  • How to sharpen a pancil for a drawing

    How to sharpen a pancil for a drawing

    Sharpening Your Pencil for Success: A Guide for Students and Beginners

    When it comes to drawing, especially in the traditional sense, the seemingly simple act of sharpening a pencil can have a profound impact on your work. A properly sharpened pencil is a properly prepared tool for a successful drawing. The right sharpening technique can transform your drawing experience, offering precision, control, and the ability to explore a range of textures and shades. Here’s a comprehensive guide tailored for students and beginners to help you sharpen your pencil for successful drawing.

    Understanding Pencil Types

    Before diving into sharpening techniques, it’s crucial to understand the types of pencils available to you. Artist-grade graphite pencils have a wide range of values and are labeled with letters “H” for hardness, or “B” for softness. The harder pencils (H series) are great for fine lines and details, while softer pencils (B series) are ideal for dark, rich shadows. Just remember, the harder the lead, the lighter the line and the softer the lead, the darker the line would appear on the paper.

    Graphite Pencils: The Hardness and Softness Spectrum

    Graphite pencils are designated with an ‘H’ for hardness and a ‘B’ for blackness (or softness), with ‘F’ (fine point) and ‘HB’ sitting in the middle of the scale as a balance between hard and soft. The ‘H’ series pencils, ranging from H to 9H, gradually increase in hardness. These pencils are characterized by their light touch and are superb for creating precise, fine lines that are essential for detailed work, technical drawings, and light shading. Their hard leads produce less smudging, making them ideal for clean, crisp lines.

    On the other end of the spectrum, the ‘B’ series pencils, from B to 9B, progressively become softer and darker. These pencils are capable of producing rich, deep shadows and are perfect for adding texture, depth, and intensity to your drawings. Their softer leads allow for smoother shading and blending, making them essential for artists looking to explore dynamic ranges of tones and contrasts.

    Sharpening a pencil with a knife versus using a standard handheld sharpener offers several distinct advantages, particularly for artists and those who require precise control over their drawing tools. Each method has its place, but the knife sharpening technique is celebrated for the level of customization and finesse it brings to pencil preparation. Here are some of the key advantages:

    1. Customized Tip Shape: A knife provides precision in sculpting the pencil to desired shapes and lengths, enabling tailored tip configurations for specific drawing needs. This method also allows for a longer taper, improving line thickness variety and drawing visibility.
    2. Pencil Longevity: Economical wood removal preserves more of the pencil, extending its usability and offering a sustainable option.
    3. Versatility: Knife-sharpening enables the creation of varied tip shapes for diverse textures, shades, and line types, essential for complex compositions.
    4. Reduced Breakage: Gentle handling minimizes the risk of pencil breakage, a common issue with softer pencils in mechanical sharpeners.
    5. Mindfulness and Preparation: The manual sharpening process can be a meditative ritual, fostering a focused and intentional mindset before starting artwork.

    The tools you’ll need:

    The right tools can make all the difference.

    • Knife or Blade: Using a knife or a specially designed artist’s blade allows for more control over the shape and length of the pencil tip. This method is preferred for achieving a longer, tapered point that exposes more of the pencil core.
    • Sandpaper Pad: After shaping your pencil with a knife or sharpener, a sandpaper pad can be used to fine-tune the point to perfection.
    Closeup of 2 X-Acto knives

    The Sharpening Process

    Sharpening with a Knife

    1. Safety First: Always cut away from your body. Hold the pencil firmly in one hand and the knife in the other.
    2. Expose the Core: Gently shave the wood around the pencil core, rotating the pencil to create an even taper. Expose enough of the core to suit your drawing needs (typically around 1/4 to 1/2 inch).
    3. Create the Point: Once the core is exposed, use the knife or a sandpaper pad to shape the tip to your desired sharpness.

    Tips for Success

    • Regular Maintenance: Keep your tools sharp and clean. A dull blade can damage your pencils and affect the quality of your lines.
    • Practice Makes Perfect: Experiment with different sharpening techniques and pencil angles to discover what works best for you and your style.
    • Mind the Mess: Always sharpen your pencils over a trash bin or a sheet of paper to collect the shavings and keep your workspace clean.
    • Explore: Don’t be afraid to try different pencil types and sharpening methods to see how they affect your drawing.

    Sharpening your pencil correctly is a foundational skill that will enhance your drawing experience. It’s not just about making a point; it’s about preparing your tool to best express your vision on paper. As you practice and become more comfortable with these techniques, you’ll find that the quality of your drawings will start to improve, reflecting the care and precision you’ve put into every aspect of your work.

    Considerations

    While the advantages are clear, it’s important to note that knife sharpening requires practice to master and is not without risks, particularly concerning safety. Using a sharp blade demands attention and care to avoid injury. Additionally, this method may not be as convenient or fast as using a handheld sharpener, particularly for those in a classroom setting or for artists who prefer not to carry blades.

    In conclusion, sharpening a pencil with a knife offers a level of customization, precision, and versatility that is unparalleled by standard handheld sharpeners. It appeals especially to artists and professionals who value the quality and specificity of their tools. As with any skill, it becomes more intuitive and effective with practice, making it a worthwhile technique to explore for anyone serious about drawing.

    Happy drawing!

  • Contour Drawing: Definition and Guide

    Contour Drawing: Definition and Guide

    Introduction:

    Contour drawing is one of the fundamental approaches to understanding and capturing the visual world around you into outlines. The ability to translate the observable world around you into an outline will enhance your understanding of form and space, transcending mere representation to capture the essence of the subject. Contour, is one of the seven functions of line, as offered in his definition by a profound American Illustrator, Andrew Loomis. It is not simply an outline, but a way to visually communicate what you see int a three-dimensional world, onto a two dimensional surface.

    Defining Contour Drawing:

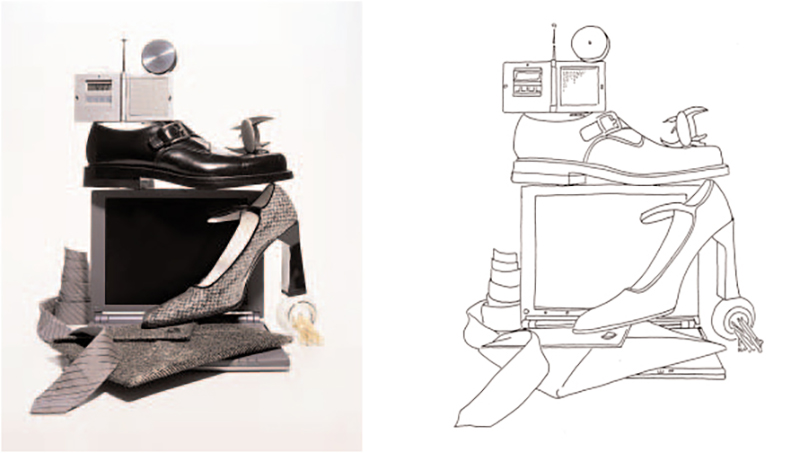
    Contour drawing focuses on rendering a subject entirely through its outlines, capturing its form and shapes without incorporating any shading, texture, or tone. It is a type of discipline, an approach that challenges students, and professional artists alike, to focus on the subject at hand, analyzing its form, volume, and space it occupies. It encourages a deeper engagement with the visual world.

    Exercises to Sharpen Your Skills:

    There are three exercises one can do to enhance and elevate one’s drawing abilities.

    • Blind Contour Drawing: Deepen your observational skills by drawing without looking at the paper, a practice that heightens sensitivity to the subject’s form.
    • Modified Contour Drawing: Introduce brief glances at your work to maintain connection with the paper while still focusing on the subject’s outline.
    • Continuous Line Drawing: Refine your hand-eye coordination by capturing the subject in a single, unbroken line, a method that fosters a more intuitive drawing process.

    Tips for Masterful Contour Drawings:

    Enhance your technique with these tips:

    • Edge Emphasis: Focus on the edges: Pay close attention to the contours and edges of the subject.
    • Draw slowly: Take your time to carefully observe and capture the details of the subject’s form.
    • The Unbroken Line: Aim to draw the entire subject without lifting your drawing tool from the paper, maintaining a continuous line.
    • Practice regularly: Set aside time for regular drawing sessions to refine your technique.
    • Diverse Subjects: Broaden your artistic horizons by applying contour drawing to a variety of subjects, enriching your portfolio with a range of forms and figures.

    Crafting Your Contour Drawing:

    Begin your contour drawing with these steps:

    1. Select a subject to draw.
    2. Set up your drawing materials, such as paper and a drawing tool.
    3. Take a moment to observe the subject and understand its form and shapes within the form.
    4. Start drawing the outlines of the subject, following its contours closely and using a continuous line.
    5. Resist the temptation to add detail, allowing the contour to express the subject’s form and character.

    Benefits of Contour Drawing:

    Contour drawing offers numerous benefits to artists, including:

    • Sharpened Observational Skills: Develop an eye for detail and form.
    • Enhanced Coordination: Develop a seamless harmony between eye and hand coordination.
    • Simplification of Form: Learn to see and capture the essence of complex subjects.
    • Increased Focus: Develop a disciple to stay focused on the subject and not rush through the drawing.

    Planning Compositions with Contour Drawing:

    Contour drawing can serve as a valuable tool for planning compositions in more detailed artworks. By outlining the main shapes and forms, artists can establish the overall structure and balance of the artwork before adding further details.

    Examples of Contour Drawings:
    Explore other artists drawings either by visiting a museum, a gallery or by finding examples on the Internet. Try to study different types and styles of contour drawing, from simple, minimalist line drawings to more complex and detailed renderings. Each artist and their unique piece is a testament to the artist’s skill and vision.

    Beyond the Basics: Exploring Contour Drawing’s Variations:

    In addition to traditional contour drawing, artists can explore variations and extensions of this technique, such as cross-contour drawing, gesture drawing, and contour hatching, each offering unique approaches to capturing form and texture.

    Essential Tools for Contour Drawing:

    While the essence of contour drawing lies in its simplicity, the choice of tools—be it pencil, pen, charcoal, or marker—can greatly influence the outcome. Experiment with different mediums to discover the textures and lines that best express your artistic voice.

    Conclusion:

    By continued and persistent practice, you will achieve desirable results in your drawings. By mastering contour drawing you will also explore opportunities for artistic expression and growth. By incorporating exercises, tips, and techniques into your practice routine, you can develop your skills and unlock your creative potential. What are you waiting for? Grab a pencil, some paper and begin drawing!

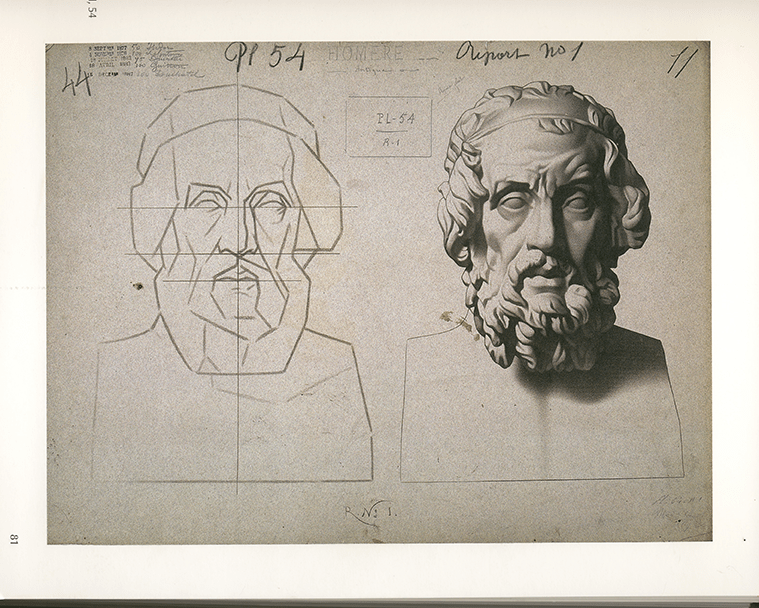
  • Charles Bargue Plates

    Charles Bargue Plates

    Here, I present a “forgotten” technique that was popular in the late nineteenth century in academic training. The technique, or rather, training course, was designed by Charles Bargue, a French painter and lithographer (c. 1826/1827 – April 6, 1883). He is notably known for creating a course that would train artists in the traditional, classical atelier style of drawing. 

    It is a common practice in traditional drawing and painting training to copy master drawings. This is meant to give students an understanding of drawing, technique, composition, and aesthetics. During the 20th century, this practice was looked down upon, because it seemed rigid and did not allow students to develop their own styles. However, nothing can be further from the truth. When interest in traditional drawing techniques returned and became more mainstream in artistic circles, people began revising the “forgotten” techniques. The reason I say “forgotten” in parenthesis, is because in some art schools throughout the world, these practices were kept and students, who dedicated themselves to this training have proven to gain a lot of experience and learn. Copying a drawing, or plates, doesn’t mean that you will be locked into a particular style or a way of doing drawing. Instead, you will gain techniques and insight into drawing that will be incorporated into your own, individual style. 

    This is not a required assignment but is highly encouraged. 

    Here’s the Charles Bargue plates pdf. 

    Here’s a good video explaining how to use this technique. 

  • Mary is Contrary – Artist Mini Documentary – Printmaking

    Mary is Contrary – Artist Mini Documentary – Printmaking

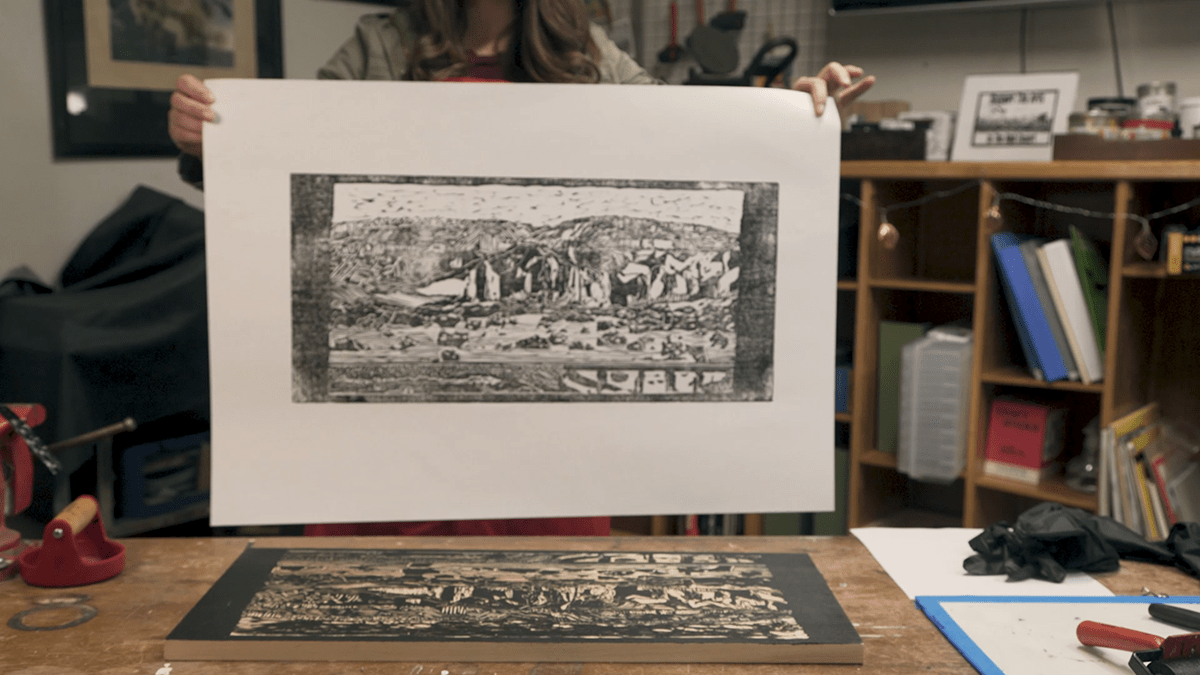
    I recently interviewed a printmaker and a fellow artist, Mary Vasquez, on her linocut and woodcut prints. This Mini Documentary shows the printmaking process and Mary’s journey to printmaking.

    The Process

    Mary has been blogging about the process of printmaking at home for a few years now on her site www.maryiscontrary.com

    Her site is a very useful and insightful recourse on printmaking where she covers topics on transfer methods, different materials , and personal recommendations for tools and paper.

    If you would like to know more about the process you can visit her posts through the links below.

    What is a Linocut? 

    Getting Started With Linocut Printmaking 

    What are the Best Lino cutting tools? 

    5 Papers for Linocut Printmaking 

    Paper info: Printmaking with Linocut 

    Paper info: Printmaking with Linocut 

    Top 5 Inks for Linocut at Home 

    Mary even has a Forum you can join to ask questions or join discussions about printmaking.

    About the Mini Documentary

    This artist Mini Documentary  was brought to you by Dmitriy Astakhov and Northgate Entertainment.

    Northgate Entertainment is a California based production company specializing in the complete creative workflow of television commercials, documentaries and films.

    Northgate Entertainment has recently published a very cool commercial around Christmas time for  IEHP . Check it out 

    For inquiries please visit www.northgateentertainment.com

  • Portraiture

    Portraiture

    In the final weeks of the class, we will be focusing on portraiture.

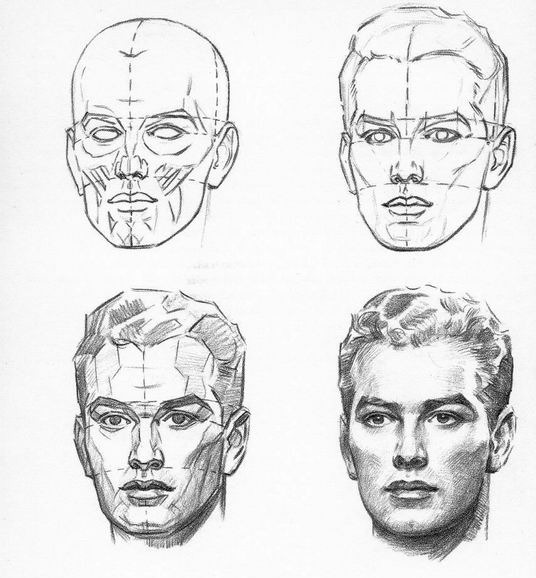
    Portrait drawing, for a beginner, can seem like a difficult task. However, there are tools used by artists that will help you achieve the structure and likeness of any face you are drawing. Although there are similarities in faces and a drawing can begin with a genetic layout, each individual face is different. It is the subtleties and differences that make us individuals. Observing and studying this individuality and translating it to your own drawing will give your portraits not only the likeness, but also character and life. Just like with any other drawing from life, you must pay close attention to the model. Do not draw what you “think” is there, but let the model “tell” you what is there. Here are the questions you should be asking yourself while observing a model: What is the overall shape of the head? How high is it compared to how wide? Is the model looking directly at you (the viewer), or is the head turned away? Where is the vertical line and the horizontal line?

    Start all of your drawings with large, loose shapes and then move to the next largest shapes. You have to go from large to small, from general to specific. If you draw an eye, and it is the most accurate eye but doesn’t fit with the rest of the face, then your portrait will be out of proportion.

    I am providing a pdf excerpt of pages from a book by Andrew Loomis on how to draw head and hands. One of the most useful tools is understanding the construction of the head. There are different methods, but Loomis’s approach has been, perhaps, the most useful and successful. A lot of artists including animators and illustrators, rely on Loomis’s approach to head construction. The reason for that being is that his approach allows for head invention. If you are an animator or an illustrator this can be very useful in creating characters from your imagination. For the next few weeks, we will be studying this approach and applying it to drawing from observation.

  • What are the Best Lino Cutting Tools?

    What are the Best Lino Cutting Tools?

    Visit maryiscontrary.com for more information on printmaking at home. For some great Linocut Process information, Mary has a very resourceful section on her site here LINOCUT PROCESS.

    Starting out with linocut printmaking can be both fun and daunting especially when you look into the large variety of tools you can purchase for linocut.

    When I first started out carving with linoleum I had to learn a lot about the different kinds of tools out there. Honestly, there are a lot that will probably get the job done and do an amazing job.

    BEST LINO CUTTING TOOLS

    To save  you some time right away and let you know what the best lino cutting tools are.  By the way, I have not used every tool out there and these are strictly my opinions. However, the tools I am about to tell you about are amazing and I think you’ll be happy with the results.  

    This post contains affiliate links, which generates some small commissions at no extra cost to you. This commission helps keep this blog and shop running. Thank you for your support. See my disclosure form for more information.

    The best Lino Cutting tools are Pfeil Swiss Made. This is Palm set B to be exact. This company sells a variety of tools, but this set specifically is amazing for working with lino cutting.

    The handles are specifically made to fit in your palms and to prevent rolling off tables. This customization really shows the craftsmanship of these tools.

    The reason why this tool set is so amazing is the dimensions of the gouges. The smallest v gouge opening measures 1mm !!! This is amazing for fine details.

    I own this set and can tell you from personal experience that the tools are so beautiful. They are strong, well crafted and definitely worth the money.

    This set B in particular comes together in this set of 6 carving tools. However you can purchase them separately. This is great in case your v gouge wears down after time.

    Pfeil’s tools are so nice. They are what you may consider to be heritage tools. The type of tool you pass on to descendants of yours.

    WHAT IS THE DIFFERENCE BETWEEN A V GOUGE AND A U GOUGE?

    When I was first learning about these kinds of tools I heard new terms like V gouge and U gouge. I had never heard of these terms or knew what they were referring to except the general shape of the tools themselves.

    V GOUGE  DEFINED

    A V gouge known especially because of the V shape at the tip of the tool is used for fine outlines and details in carving.  The shape it carves out is great for outlining or for defining an edge.

    The V gouge that comes with the Pfeil set previously mentioned is perfect for very small details. Although, there are many different sized v gouges out there. The difference in the sizes can give you a large range of carved results.

    U GOUGE DEFINED

    A U gouge can have a couple of different purposes. The smaller U gouge sold in the pfeil set mentioned is called a veiner. It can expand the opening in the carved out portion that the small v gouge carved out.

    The larger U gouges are used for clearing out sections of the linoleum. This can make it simpler for removing large sections where you may not want ink.

    In carving out these large sections these U gouges can leave behind “Noise” is what I have heard it called. It is the small wavy lines that catch ink when you print. The wider the U gouge used the less of this Noise you will have left on  your linoleum.

    It’s definitely the artists preference whether or not to keep the noise sections or to carve it out a bit deeper. I like the noise in some of my projects, but have tried to avoid it when I am making something a bit more technical.

    ARE THESE TOOLS ONLY GOOD FOR LINO CUTTING?

    These Pfeil carving tools are not only excellent at carving linoleum, but they can also be used with rubber, or most commonly when carving wood.

    Wood cut is another form of relief printmaking using wood instead of linoleum. The tool used for this are interchangeably used between linoleum and woodcut printmaking.

    When I first got into linocut printmaking my Dad gave me an old set of wood carving tools we had used years prior in a wood carving class.

    They worked fantastically, however I opted for the Pfeil tools not too long after because they had smaller gouges for fine detail.

    HOW TO CARE FOR LINO CUTTING TOOLS?

    Pfeil tools will need proper care of its handles. A little linseed oil every now and again on the wood will help to condition the wood. In especially dry areas you may need to do this more frequently. You will start to notice the handles lighten and drying out.

    You will not need a lot of oil, just a bit dabbed onto a rag will do the trick. Use the dry side of the towel or rag to wipe off any excess oil.

    PLASTIC OR VARNISHED HANDLES

    Some of the other kinds of lino cutting tools you can purchase may have plastic handles or varnished wooden handles.

    If this is the case, oil will not be necessary for preservation. However, keeping the tools from exposure to heat will be important.

    Keep all of them out of reach from any heat source like a sunny window. They will still last quite a long time even if kept in these environments, but there may be some cracking of the plastic handles or even some blistering of the varnished wooden handles.

    HOW TO SHARPEN LINO CUTTING TOOLS?

    Pfeil has a guide about how to sharpen their cutting tools.  They suggest using a sharpening stone with a 100-120 grit.

    For a guide from Pfeil about their specific sharpening stones they carry click here.  (not an affiliate link, just for your information only).

    I have personally not gone this route for sharpening the Pfeil tools. Instead, I use a Slipstrop which is a wooden and leather combination. This tool does not sharpen the tools, but it deburrs the inside of the gouges.

    While carving the linoleum, I have had to use the Slipstrop a few times. It definitely helps keep the tools at their best especially to avoid injury.

    HOW WILL I KNOW WHEN TO SHARPEN LINO CUTTING TOOLS?

    You will be able to tell when it is time to deburr  your lino cutting tools once you have started carving a bit and the tools do not smoothly cut away the linoleum and it requires more force.

    Sharpening with a sharpening stone can be done less often and may not be needed for a few years of use.

    It is best to use the slipstrop often during carving to avoid injury. After you have worked with your tools a bit and get used to deburring them or even sharpening them, you will get a feel for your tools and know when they need sharpening.

    HOW LONG WILL LINO CUTTING TOOLS LAST?

    With proper storage and maintenance your tools could last decades. They are like most tools, the better you take care of them, the longer they will last and work properly.

    WHAT ARE SOME  MORE AFFORDABLE  LINO CUTTING TOOLS?

    If you do not want to invest in your lino cutting tools you can get some really good options for less of an investment.

    I still sometimes use my Speedball lino cutting tool for the larger v gouges or the Xacto blade.

    Other options can include using a dremel for textured effects, or an Xacto blade, and even a small punch drill bit I found in a hobby store.

    The fun part of making art can be the tools as well. If you get creative enough, you can make all sorts marks on your linoleum which can have some interesting results.  
    —
    Mary VasquezMaryisContrary.com